
- News
- Updates to this website are all listed in What's New or use Search
Club members have many years' experience with all types of surf fishing and other shore based salt water fishing under all weather conditions, and casting all types of rods and reels. They can give lots of hints and tips about fishing techniques, fishing tackle, rigs, casting your rods and everything else about fishing in Western Australia under all conditions.
Even though reading about hints and tips may be interesting, there's nothing like seeing them in practise to really understand them and get the full benefit. So join the club or come to any of our events as a visitor, where the members will give you lots of practical hints and tips, including those which you can only get while out fishing, or while handling the tackle.
Come to some Club events as a visitor, to our monthly dry casting mornings, fishing trips or general meetings. Read more
Come to a Club event to meet us and make sure you are happy with how the club suits your needs, then fill out and send us the membership application form. Read more
This page has some of those hints and tips on fishing, casting, tackle, rigs, etc. Articles will be added as they are ready. Check What's new for updates.
| Rod stand | ||
| Waders | Catch and release | Preparing fish for cooking |
| Reef bags | Reef boots | Fishing for photos |
| Using Alvey Reels | Fishing for herring from the shore |
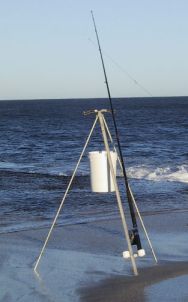
The photo shows a light weight adjustable and folding rod stand used by several club members. The 20 litre bucket of water, sand or rocks is to give it stability.
A stand like this is really useful where you can't push an ordinary rod holder into the ground. Used on flat reefs as shown, or when fishing from rocks, or even on the beach.
It's also great for holding the rod while you have a balloon bait out, while rigging up, and you can also hang some gear up out of the water, if it won't tangle the line. This version holds two rods.
A stand like this can be made by a handy person in a few hours from a few lengths of aluminium extrusions, with simple tools like a drill, hacksaw, hammer, file and a vice.
I've added more detailed photos and descriptions if you would like to make one yourself or get one made for you. Read more
Catch and release fishing is popular, which is good news for our fisheries. Catch and release angling is one of the most important tools that recreational anglers can use to preserve and manage a fishery.
If you intend to release the fish that you catch, there are important steps you can take to improve your chances of releasing a fish that will live another day.
Landing the Fish. Over-exertion/exhaustion will kill many of the fish you release, so use common sense. Using extremely light tackle will prolong the fight and delay the landing of your catch, and in certain conditions it can result in death to the fish. The first key to proper release is to play the fish quickly.
Landing the fish can also cause physical stress to the fish. A big nylon net with large-string netting can become caught in the gills of a fish and cause serious physical damage. This damage often results in a dead fish. Use a catch and release net made of a fine cotton mesh, or a "knotless" net. Using it will vastly improve the chances of survival for the fish.
Not using a net at all is the altogether best choice as long as you keep the fish in the water. Many anglers lift the fish out of the water. This action simply deprives the fish of water and oxygen. A fish can only breath when it is in the water. The less time out of the water for the fish, the better. Ideally the fish should never leave the water. If you want to photograph your catch, have the camera ready and minimize the time that the fish is out of the water.
Releasing the Fish. Use care and be gentle when touching a fish. Don't squeeze the fish to get a good grip, you'll traumatize the fish by crushing its internal organs and by removing its protective slime coating. This outer slime coating prevents disease and is essential for the fish's health.
Always keep your fingers out of the fish's mouth and gills, and use needle-nose pliers to remove embedded hooks. Turning a fish upside down sometimes calms it and makes for an easier release.
Fish with barbless hooks or with crushed barbs whenever possible. There are three obvious advantages to using barbless hooks:
1. If you hook yourself at all, the hook will come out without you having to visit the emergency room.
2. You will hook your fish easier because a barbless hook penetrates a fish's mouth better than a barbed hook.
3. Barbless hooks are much easier to remove from a fish's mouth, so you release the fish quicker.
If the fish swallows your hook, cut the line as close to the mouth as possible without causing injury to the fish. The hook will dissolve quickly, provided you are not using stainless steel hooks. If you're really serious about catch and release, don't use stainless steel hooks unless they give a real advantage for your type of fishing.
Finally, you will need to release the fish. While gently holding the fish's tail and supporting its underbelly, guide it through the water to exercise its gills. Face the fish into the current so that it can control its breathing. The fish will usually kick and swim away when it is ready.
Next time you are replacing your chest waders, consider trying on a pair of neoprene waders. They are more expensive, but due to their flexibility they are much more comfortable to wear and a lot easier to move around in.
Many users won't go back to plastic waders.
We would like to warn of some important safety flaws in many shoulder bags used for holding the fish you have caught.
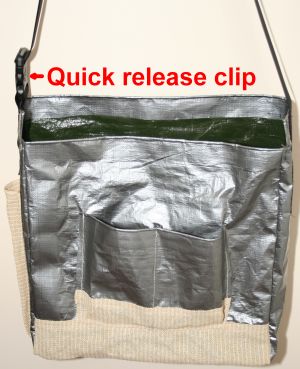
Reef bag with good drainage and quick release
buckle
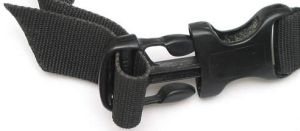
One style of quick release buckle with
adjustable strap
When fishing on deeper wave-washed reefs where there is a chance of copping a wave on the chest, the bag may quickly fill up with water and drag you down.
Many bags have only small drainage holes in the bottom, and these get covered and blocked by the fish in the bag.
Solid walled bags and those with small drain holes fill up and act as drogues and may pull you over or may be so heavy when full of water they hamper your movements and recovery.
Many reef bags have fixed shoulder straps. When filled with water, it is very difficult to lift the bag over your head if you are struggling in the water. Quick draining bags (eg those with a mesh wall or bottom) allow the water to pass through and out.
The solid walled bags allow your gear inside the bag to float around and gear may be lost. In the open-walled versions the water passes through and down and the water flow tends to keep fish and tackle boxes in the bag.
Having watched some people struggling on the reefs at Rottnest on field days led to some improved designs as shown, and which have been tested by Club members in some extreme conditions on reefs.
The Club's recommendation is that for your safety all shoulder bags used on reefs should have, at least:
1. a quick release buckle on the shoulder strap to allow the bag to be dropped off in an emergency, and
2. a mesh side and bottom of sufficient size not to get blocked by fish, and which allows a full bag of water to drain out within a few seconds at most.
Some people may think that because open walled bags drain so well and let out blood and smell from the fish and bait, these bags will tend to act as berley bags and can attract wobbegong sharks or stingrays to your feet or nearby.
This has happened to some people, but it will happen with all bags that have any effective form of draining holes, and your safety is more important.
For almost any time you need to go onto rocks or reefs, you will get a great grip with reef boots fitted with steel spikes, as shown in the photo. These ones, Mirage Rock Hoppers, cost around $70 and were the best investment in fishing shoes I have ever made. They have been cheaper at times, so shop around.

Mirage Rock Hopper reef boots
They are much better than any other soled shoes for almost any hard surfaces. The high sides give some support to your ankles, which is important on the rocks and reefs.
They have a block tread which is good on sand, and the steel spikes cut though slime and grip on weed, limestone rocks and reefs, and even on hard granite rocks.
The uppers are made of neoprene type material and the soles of rubber. So they can take getting wet and are still comfortable to wear.
Try a size that fits over a pair of thick woollen socks, so that you can wear them in comfort and don't get blisters from rubbing and from any sand which might get in the boots. Good wool socks will be OK when wet, too.
And when the steel spikes wear down, as they will eventually, you can cut some of the block tread away to expose the spikes, or hang the expense, buy a new pair - they are worth it.
Don't forget the steel spikes when you're wearing them - they definitely DON'T go well on polished timber floors.
We've all heard comments like "You can't freeze tailor", "Salmon aren't worth eating", "Eat herring fresh, they're no good after they've been frozen", etc.
But sometimes there is a good reason to freeze a few fish, eg when you're away from home for a while and want to take some fish home for the family. If you have caught and kept a few fish, then it is important they are not wasted, and that you get the best out of them. This way really works, and will improve the taste and texture of any fish.
First of all, look after your fish. Bleed them all as soon as they are caught. Gill and gut them as soon as possible. Keep them cool, and put them on ice as soon as possible. Even icing half an hour sooner while driving back home makes a big difference in any weather. Any fish to be frozen should be packed and frozen as soon as possible.
Thawing frozen fish. Make sure the outside of the pack of fish does not get warm while the inside is still thawing. Thawing in the fridge guarantees this but takes a lot longer. The next step can be done once the fillets or the fish can be cut, even if they're still a bit icy.
Cutting up. Either fresh fish or frozen fish. Larger fish: lay the fish fillet skin side down on a cutting board, and take off slices of fish around 10 -15 mm thick. Trim off any dark flesh and skin. Fillets of smaller fish like herring can be left whole but may be skinned if you like it that way.